
Spike Index | Introduction | Press Release | Documentation | Tutorial | Download | Register
Back to YAV.com | Back to YAV's Download Area
Step 15) (optional) Check the "Pre-sort with MCP log files" checkbox if you compressed your source material using Movie Cleaner Pro.
Step 16) Initiate the batch analysis. You can start the analysis in one of three ways: Press the "Analyze" button at the upper left of Spike's main window, select "Analyze..." from the Tools menu, or press "Command-B" (the keyboard shortcut you assigned in step 14). If you selected "Pre-sort with MCP log files" then you will first be prompted for the Movie Cleaner Pro log file pertaining to the batch compression. Then you will be prompted to select a folder containing the movies to be analyzed.
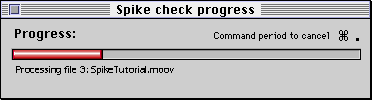
Analysis will proceed and a progress bar will inform you of the current status.
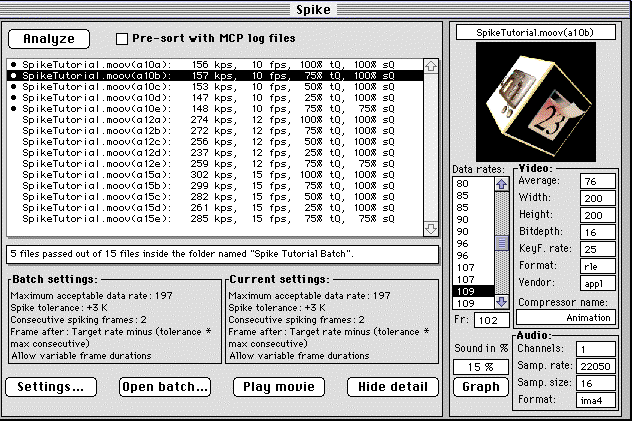
Step 17) Examine the results of your batch analysis. You will see a listing of the movies in the main window's report field resembling this:
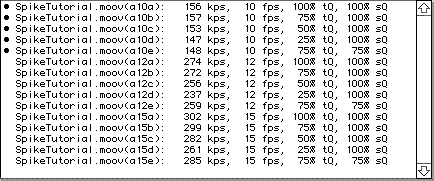
In the example above, you can quickly see that 5 of the 15 files passed the settings requirements for this batch. This fact is stated in the center "Status" field in the window. The files that passed are proceeded by a bullet. In this illustration, the five files that passed are at the top of the list. This depends upon your file-naming conventions and will not always be the case. Note that all the 10 frames-per-second files passed and because of the way the filenames sorted alphabetically, these were the first files processed and hence, the first files on the list (which displays the files in the order they were processed).
This example dramatically demonstrates how Spike can identify which QuickTime movies are the best for your playback media and deployment platform. All of the movies processed in this batch indicated average data rates well below the target maximum yet two-thirds of these movies have unplayable data spikes! Without Spike this fact would be very difficult to determine because if is customary for QuickTime compression software to report average data rate rather than maximum data rate. The high spikes are listed in center of the analysis field, followed by the frame-rate, temporal quality setting and spatial quality setting.
Below the analysis field are two boxes labeled "Batch settings" and "Current settings." The Batch settings box displays the significant settings that were in effect when this batch was analyzed. If you were to make some changes in the Settings window at this time, those changes would be displayed in the Current settings. Often, these two boxes display the same information, however, the Batch settings are saved with any batch files you save using the File menu so reloading a file is one situation in which the Batch settings box might display different information than the Current settings box.
Selecting "Print" now from the "File" menu will print the contents of the analysis field.
You can compare this to one of the movies that did pass by clicking here.
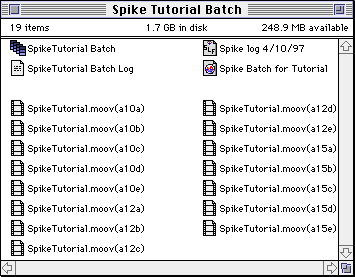
Note: If you used the "Pre-sort with MCP Log files" option, the folder containing your movies will contain two new folders (the results of the pre-sort) and will resemble this:

Otherwise, it will probably look something like this:
Step 18) Click on a line in the analysis field to display the details about that movie at the right (you may need to press the "Show/Hide detail" button at the bottom of the window in order to display the details pane). You can use the up and down arrowkeys to select other movies in the analysis field or you can select them by clicking their names. As you can see from the previous illustration, the selected movie in this case has an average data rate of 134 kps. Because most software reports this figure, most people would have believed that this file would have been fine to include on a CD-ROM (they would have probably chosen it because it has the highest quality of all the files in this batch while still "seemingly" well below the limit according to the execrable average data rate value).
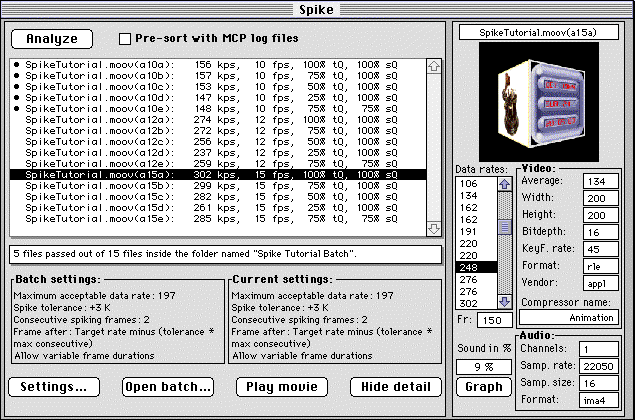
Looking at the "Details" pane of Spike's main window (the right side), you can see much more information about the file selected in the analysis field. The Data rates field displays the kilobytes-per-second data rate of every frame in the movie. The video box displays information about the video track: the nefarious "Average" data rate, the width and height of the frame (in pixels), the Bit depth of the movie (16 = thousands of colors in this example), the Key frame rate (or variable if the rate is variable), the Format, Vendor, and Compressor (Codec) name.
The lower portion of the "Details" pane provides information about the audio track (if any): Channel number (1 or 2 for mono or stereo), Sample size and rate, and sound format (e.g., AIF or ima4, etc.). We can also see that in this particular file, the audio track represents 9% of the data rate. In other words, 10% of the available bandwidth will be devoted to audio during playback.
Tip: If you are using the up and down arrows to navigate through a large number of movies, you might want to press the "Hide Details" button to close the details pane at the right side of the main window. With the details pane close, all the fields it contains will not have to update every time you select a new movie in the analysis field.
Step 19) Click on the miniature video preview box at the upper right to play the miniature preview. Click again to stop playback.
Step 20) Move the cursor over the file name field while holding the option key down (above the miniature preview) to display the full path to the file. The full path will appear inside a "Help balloon." Note that you do not have to hold the mouse-button down, just the option key.
Step 21) Click on a number in the Data rates field to display the corresponding frame in the miniature video preview box at the upper right and frame number in the frame number box below the data rate list. You can use the right and left arrow keys to navigate this field with the miniature preview continually updating to the current frame.
Step 22) Hold the mouse button down while the cursor is over the "Fr." (Frame Number) field and roll up or down to increase or decrease the current framein sync with the miniature video preview box and also the data rates list. This is useful if you want to locate the data rate at specific frame numbers.
Step 23) Move the cursor over the frame number while holding the option key down to display the current frame in 30fps SMPTE (i.e., HH:MM:SS:FF) inside a ""Help balloon." Note that you do not have to hold the mouse-button down, just the option key.
|
|
|
Spike Index | Introduction | Press Release | Documentation | Tutorial | Download | Register
Back to YAV.com | Back to YAV's Download Area