Spike Index | Introduction | Press Release | Documentation | Tutorial | Download Spike | Register
Back to YAV.com | Back to YAV's Download Area
To use this tutorial, you will need at least one QuickTime movie (we'll assume that you have some computer-generated animations for the tutorial) and a copy of Spike (the demonstration copy will serve for this tutorial). You will also need some way of compressing the movie (Apple's MoviePlayer will do but Terran's Movie Cleaner Pro would be better).
The object of this tutorial is to teach you how to get the most out of Spike and, particularly, how to use Spike to identify the best movie from a batch of movies that were all compressed from a single source movie, each using different compression settings. Because the demo version of Spike limits you to processing batches of 15 files at one time, this tutorial will work with a batch of 15 compressions.
Step 0) This step is optional. Experiment with your video material a bit before beginning a batch compression/analysis session to acquire a "feel" for the way a movie is going to compress at different settings. We recommend taking some samples from you video material and running them through a wide variety of settings. We keep an objective hand-written log of the settings we use for each compression. Then, we keep another record of subjective reactions to each version of each movie (the people giving the reactions are usually not aware of the settings used to generate the movies). We've found that at this stage, it's a good idea to have two monitors so that two versions of a movie can be compared, frame by frame zoomed-in to full screen (i.e., with pixel doubling) -- you may even want to add a "real" magnifying glass to this scenario -- for cases where two versions of the same movie might seem to be identical in quality.
Step 1) Determine 15 QuickTime compressions settings (or more if you are using a registered version of Spike) for your material. If you haven't developed a range of settings for this tutorial, here are about a hundred settings you can experiment with assuming that your source is computer-generated animation at a frame rate of at last 24 fps with a color-depth of "millions" or "thousands." It goes without saying that your dimensions will be QuickTime-friendly (i.e., evenly divisible by 4). If you've done the optional step zero, your settings will be much tighter than the samples provided.
Set the output to "Thousands of Colors"
If there is an audio track, convert it to 16-bit, 22 kHz, mono, ima 4:1
For the tutorial, choose 15 of the following settings, Notice how every next setting steps the quality down slightly, whether it is the spatial or temporal quality. While this is happening, the key-frame rate also decreases from one every 2 seconds to one every 2.5 or 3 seconds. If you are using Terran's Movie Cleaner Pro and have narrowed down your "ballpark" frame-rate and quality settings, you may wish to gradually change the blur and noise reduction settings rather (than the quality settings) by stepping the blur settings up from none to extreme while permuting the noise-reduction settings that are appropriate for your material. The important thing is to get a range of settings that progress from what you consider to be the optimum achievable quality in graduated steps down to what you consider to be your lowest acceptable quality. Then leave it to Spike to identify which movie will be the best for your target platform and storage medium.
Choose five settings from each of the following groups:
15 fps, 100% Spatial Quality, 100% Temporal Quality, key frame every 45 frames
15 fps, 100% Spatial Quality, 75% Temporal Quality, key frame every 45 frames
15 fps, 100% Spatial Quality, 50% Temporal Quality, key frame every 45 frames
15 fps, 100% Spatial Quality, 25% Temporal Quality, key frame every 45 frames
15 fps, 75% Spatial Quality, 100% Temporal Quality, key frame every 45 frames
15 fps, 75% Spatial Quality, 75% Temporal Quality, key frame every 45 frames
15 fps, 75% Spatial Quality, 50% Temporal Quality, key frame every 45 frames
15 fps, 75% Spatial Quality, 25% Temporal Quality, key frame every 45 frames
15 fps, 50% Spatial Quality, 100% Temporal Quality, key frame every 45 frames
15 fps, 50% Spatial Quality, 75% Temporal Quality, key frame every 45 frames
15 fps, 50% Spatial Quality, 50% Temporal Quality, key frame every 45 frames
15 fps, 50% Spatial Quality, 25% Temporal Quality, key frame every 45 frames
12 fps, 100% Spatial Quality, 100% Temporal Quality, key frame every 30 frames
12 fps, 100% Spatial Quality, 75% Temporal Quality, key frame every 30 frames
12 fps, 100% Spatial Quality, 50% Temporal Quality, key frame every 30 frames
12 fps, 100% Spatial Quality, 25% Temporal Quality, key frame every 30 frames
12 fps, 75% Spatial Quality, 100% Temporal Quality, key frame every 30 frames
12 fps, 75% Spatial Quality, 75% Temporal Quality, key frame every 30 frames
12 fps, 75% Spatial Quality, 50% Temporal Quality, key frame every 30 frames
12 fps, 75% Spatial Quality, 25% Temporal Quality, key frame every 30 frames
12 fps, 50% Spatial Quality, 100% Temporal Quality, key frame every 30 frames
12 fps, 50% Spatial Quality, 75% Temporal Quality, key frame every 30 frames
12 fps, 50% Spatial Quality, 50% Temporal Quality, key frame every 30 frames
12 fps, 50% Spatial Quality, 25% Temporal Quality, key frame every 30 frames
10 fps, 100% Spatial Quality, 100% Temporal Quality, key frame every 25 frames
10 fps, 100% Spatial Quality, 75% Temporal Quality, key frame every 25 frames
10 fps, 100% Spatial Quality, 50% Temporal Quality, key frame every 25 frames
10 fps, 100% Spatial Quality, 25% Temporal Quality, key frame every 25 frames
10 fps, 75% Spatial Quality, 100% Temporal Quality, key frame every 25 frames
10 fps, 75% Spatial Quality, 75% Temporal Quality, key frame every 25 frames
10 fps, 75% Spatial Quality, 50% Temporal Quality, key frame every 25 frames
10 fps, 75% Spatial Quality, 25% Temporal Quality, key frame every 25 frames
10 fps, 50% Spatial Quality, 100% Temporal Quality, key frame every 25 frames
10 fps, 50% Spatial Quality, 75% Temporal Quality, key frame every 25 frames
10 fps, 50% Spatial Quality, 50% Temporal Quality, key frame every 25 frames
10 fps, 50% Spatial Quality, 25% Temporal Quality, key frame every 25 frames
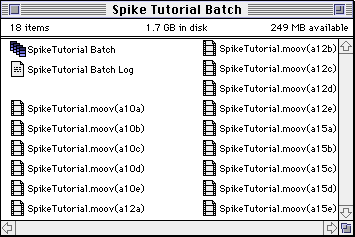
Step 2) Compress 15 versions of your source movie, each using a different setting. Of course, this will be easiest if you are using a program that supports batch compression such as Terran's Movie Cleaner Pro (or Media Cleaner Pro). If you don't have Movie Cleaner Pro you could automate the compression process using Apple's Movie Player and CE Software's QuicKeys. Alternatively, you can compress each version of the movie separately, adjusting the settings individually using Apple's Movie Player or other compression tool. In any case, you may want to name each version in a way that will enable you to identify the settings used to compress a file simply by looking at the file name (e.g., by adding an extension or suffix indexed into your list of settings). After you run the batch through Spike, you'll have all the information like frame-rate, temporal and quality settings, and color-depth, however, Spike can't tell if you've applied special filters such as those that are available in Movie Cleaner Pro. Because of this, a logical filename suffix system can help. Note: if you are using Movie Cleaner Pro, be sure to save your log file after running the batch compression. Spike can operate considerably faster if it pre-sorts your files with a Movie Cleaner Pro log.
Here is how the resulting compressed files are named.

Step 3) You now have enough source material to launch Spike. You have created 15 movies that vary in quality from what you consider to be the optimal quality to the minimal acceptable quality. If you've arranged your file-naming suffixes logically, sorting the file list by name can present the list in descending order of quality. Alternatively, if you've compressed the movies in calculated order (either as a Movie Cleaner Pro batch or individually with Movie Player), then sorting the file list by date will present the list in ascending order of quality.
Spike Index | Introduction | Press Release | Documentation | Tutorial | Download Spike | Register
Back to YAV.com | Back to YAV's Download Area